To revert any changes to your Windows, Control Panel is the first and foremost way. You can configure your Windows according to your need, by making changes in the settings for different settings under the hood of Control Panel. Today, in this article, I’ll show you, how you can access Control Panel straight from Desktopcontext menu in Windows 8.

Now here is the how to part. The trick just requires the basic knowledge of Registry Editor such as creating, editing etc. of registry keys. So here we go…
Add Control Panel to context menu and create cascading menu
Press Winkey + R combination, type regedit in Run-Dialog box and hit Enter to open the Registry Editor.
Navigate here:
HKEY_CLASSES_ROOT\DesktopBackground\Shell
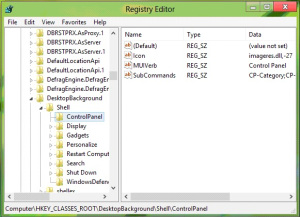
In the left pane of this location, create a subkey using Right Click -> New -> Key. Name it as ControlPanel. Moving on, in the right pane of this newly created subkey, create three strings with corresponding data:
MUIVerb : Control Panel
SubCommands : CP-Category;CP-Icons;|;CP-AllSettings;CP-AllTasks
Icon : imageres.dll,-27
Add Cascade Options
HKEY_CLASSES_ROOT\DesktopBackground\Shell
In the left pane of this location, create a subkey using Right Click -> New -> Key. Name it as ControlPanel. Moving on, in the right pane of this newly created subkey, create three strings with corresponding data:
MUIVerb : Control Panel
SubCommands : CP-Category;CP-Icons;|;CP-AllSettings;CP-AllTasks
Icon : imageres.dll,-27
Add Cascade Options
Now head on to following location:
HKEY_LOCAL_MACHINE\SOFTWARE\Microsoft\Windows\CurrentVersion\Explorer\CommandStore\shell

In the left pane of this location, create a subkey using Right Click -> New -> Key. Name it as CP-AllSettings. It will automatically create a Default string in the right pane, modify its Value data by All Settings. Now in the right pane of this location, create a string Icon with Value data as imageres.dll,-27.
Follow this procedure, to create three more subkeys in the same location. Firstly name them as CP-Icons, CP-Category, CP-AllTasks. (See Screenshot)

Now modify Default strings of these so created subkeys by following Value data:
CP-Icons : Icons View
CP-Category : Category View
CP-AllTasks : All Tasks
Finally, create a string Icon with Value data as imageres.dll-27 in the right pane of each subkey independently.
Next, create the subkey of the key created in the step 5 i.e. CP-AllSettings using same procedure. Name it as command. In the right pane of command, edit the Value data of Defaultstring to
explorer.exe shell:::{F90C627B-7280-45DB-BC26-CCE7BDD620A4}.
Similarly create subkeys of the subkeys create in step 5, i.e. CP-Icons, CP-Category, CP-AllTasks and name them as commandeach.
In the right pane for each command subkey created, use following data:
For the subkey command of CP-Icons, edit the Default string in the right pane to explorer.exe shell:::{21EC2020-3AEA-1069-A2DD-08002B30309D}.
For the subkey command of CP-Category, edit the Default string in the right pane to explorer.exe shell:::{26EE0668-A00A-44D7-9371-BEB064C98683}.
For the subkey command of CP-AllTasks, edit the Default string in the right pane to explorer.exe shell:::{ED7BA470-8E54-465E-825C-99712043E01C}.
To save your time, you can use ready-made registry file to added the Control Panel option to context menu in few clicks. You can download it HERE.

Download our Android App Best Computer Guide

That’s it. Now press Windows Key + D to access Desktop and then right click, and get access to Control Panel.
Have phunn!!!!
Similarly create subkeys of the subkeys create in step 5, i.e. CP-Icons, CP-Category, CP-AllTasks and name them as commandeach.
In the right pane for each command subkey created, use following data:
For the subkey command of CP-Icons, edit the Default string in the right pane to explorer.exe shell:::{21EC2020-3AEA-1069-A2DD-08002B30309D}.
For the subkey command of CP-Category, edit the Default string in the right pane to explorer.exe shell:::{26EE0668-A00A-44D7-9371-BEB064C98683}.
For the subkey command of CP-AllTasks, edit the Default string in the right pane to explorer.exe shell:::{ED7BA470-8E54-465E-825C-99712043E01C}.
To save your time, you can use ready-made registry file to added the Control Panel option to context menu in few clicks. You can download it HERE.
Download our Android App Best Computer Guide
That’s it. Now press Windows Key + D to access Desktop and then right click, and get access to Control Panel.
Have phunn!!!!
No comments:
Post a Comment