Add Control Panel to Desktop Context Menu and Create Cascading Options

To revert any changes to your Windows, Control Panel is the first and foremost way. You can configure your Windows according to your need, by making changes in the settings for different settings under the hood of Control Panel. Today, in this article, I’ll show you, how you can access Control Panel straight from Desktopcontext menu in Windows 8.
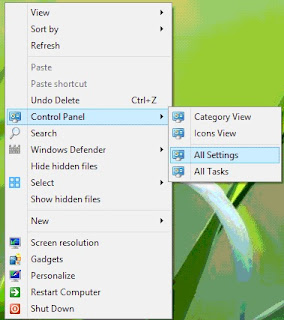
Add Control Panel To Desktop Context Menu


Now here is the how to part. The trick just requires the basic knowledge of Registry Editor such as creating, editing etc. of registry keys. So here we go…

Add Control Panel to context menu and create cascading menu

Press Winkey + R combination, type regedit in Run-Dialog box and hit Enter to open the Registry Editor.

Navigate here:

HKEY_CLASSES_ROOT\DesktopBackground\Shell
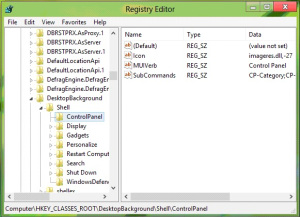


In the left pane of this location, create a subkey using Right Click -> New -> Key. Name it as ControlPanel. Moving on, in the right pane of this newly created subkey, create three strings with corresponding data:

MUIVerb : Control Panel

SubCommands : CP-Category;CP-Icons;|;CP-AllSettings;CP-AllTasks

Icon : imageres.dll,-27


Add Cascade Options
Now head on to following location:

HKEY_LOCAL_MACHINE\SOFTWARE\Microsoft\Windows\CurrentVersion\Explorer\CommandStore\shell
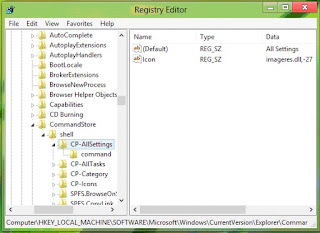


In the left pane of this location, create a subkey using Right Click -> New -> Key. Name it as CP-AllSettings. It will automatically create a Default string in the right pane, modify its Value data by All Settings. Now in the right pane of this location, create a string Icon with Value data as imageres.dll,-27.


Follow this procedure, to create three more subkeys in the same location. Firstly name them as CP-Icons, CP-Category, CP-AllTasks. (See Screenshot)
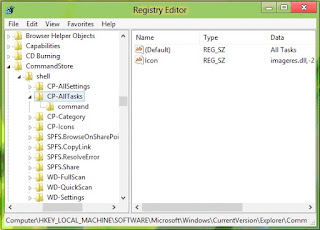


Now modify Default strings of these so created subkeys by following Value data:

CP-Icons : Icons View

CP-Category : Category View

CP-AllTasks : All Tasks

Finally, create a string Icon with Value data as imageres.dll-27 in the right pane of each subkey independently.
Next, create the subkey of the key created in the step 5 i.e. CP-AllSettings using same procedure. Name it as command. In the right pane of command, edit the Value data of Defaultstring to 

explorer.exe shell:::{F90C627B-7280-45DB-BC26-CCE7BDD620A4}.

Similarly create subkeys of the subkeys create in step 5, i.e. CP-Icons, CP-Category, CP-AllTasks and name them as commandeach.

In the right pane for each command subkey created, use following data:

For the subkey command of CP-Icons, edit the Default string in the right pane to explorer.exe shell:::{21EC2020-3AEA-1069-A2DD-08002B30309D}.

For the subkey command of CP-Category, edit the Default string in the right pane to explorer.exe shell:::{26EE0668-A00A-44D7-9371-BEB064C98683}.

For the subkey command of CP-AllTasks, edit the Default string in the right pane to explorer.exe shell:::{ED7BA470-8E54-465E-825C-99712043E01C}.

To save your time, you can use ready-made registry file to added the Control Panel option to context menu in few clicks. You can download it HERE.


Download our Android App Best Computer Guide


That’s it. Now press Windows Key + D to access Desktop and then right click, and get access to Control Panel.

Have phunn!!!!

How to take Ownership of any File or Folder


If you have to work in a shared system environment you might be aware of the fact that taking ownership of a file or a folder on Windows can be a complicated chore. Even the seemingly simple task of adding URLs to a Windows Host file requires the user to become an owner of the file by going into the file security settings and acquiring full access permissions to work on it. Having so many steps to complete, even when you have an admin account can be a bit frustrating.


If it’s just one file, making a change might not be too time consuming, but if you do this on a regular basis, then use this simple tool called TakeOwnershipPro to easily deal with file ownership issues.


TakeOwnershipPro for Windows

TakeOwnershipPro is a free, lightweight program that makes the process of gaining file ownership take not more than a mouse click. To get started, you can download the setup file and install it on your system. The installer is clean, with no third-party apps attached, so you can simply follow the onscreen instructions to complete the installation.

Now if you need to take ownership of any folder, launch TakeOwnershipPro, click the Add button to choose the folder or file of which you want to take ownership, or simply drag and drop the file from Windows Explorer.


Now all you need to do is click Take Ownership and wait for the tool to do its magic. Don’t forget to check the option Include subfolders and files if you wish to take ownership of everything that’s in the folder you selected.

The tool also adds itself to the Windows right-click context menu, so you can simply right click on a file or a folder to take ownership. If the User Account Control dialog box appears, click Yes to allow TakeOwnershipPro to run and make changes.


How the Tool Works

The tool simply automates the task of taking ownership of a file through its folder security settings, but most everyday Windows users are unaware of what this means. TakeOwnershipPro adds‘Everyone’ as an owner and gives full control of that particular folder to the user.


If you wish to delete the complete ownership of the file, all you have to do is go into the Advanced Security Settings and delete the Everyone permission that has been added by TakeOwnershipPro
Conclusion:

That was how you can easily take ownership of any file or folder. The app works on Windows 7 and above and is free to use without any limitations. So next time you get a message from Windows saying you don’t have permission to access a particular file or folder, all you need to do is use TakeOwnershipPro and show Windows who’s boss.

Feel free to ask for any further help in comments….

How to add Copy to and Move to Options under Right Click Menu


This is one of the coolest tricks for any windows OS to add a custom copy to and move to options under the right click menu for any files or folders.This will make easy whenever you want to move or copy any file of folder in your system. Now get rid of the usual copying or moving of files or folders by this trick. 


Download our Android App Best Computer Guide


I am very much sure that this trick will help you a lot. All you have to do is to edit your registry and add a new sub-key. Don't worry if you are not well familiar with the registry, i will give you full instructions and any help if needed.I already posted a lot of registry hacks, you can access all that from Registry Tricks category if you are interested in studying that.

Ok, leave all that now we can start this trick, Follow the steps:
Step 1: Open Run Dialog box, type "regedit" without quotes and hit Enter.

Step 2: A registry editor window will be opened , now browse to the below key

HKEY_CLASSES_ROOT\*\shellex\ContextMenuHandlers

Step 3: Right click the "Context Menu Handlers" key and choose New->Key.
Step 4: Name the new key “Copy To” (without the quotes).
Repeat the above and create another new key named Move To

Step 5: Select the Copy To key and in the right hand pane, double click “Default”

Enter this clsid value as the value data:

{C2FBB630-2971-11d1-A18C-00C04FD75D13}

Next , select the Move To key and in the right hand pane set the default value to:

{C2FBB631-2971-11d1-A18C-00C04FD75D13}

And that's it you are done, 
now you can check this by right clicking any file ,you can see as below screenshot , there will be 2 new options


Now this is for files , we can give this to Folder Options also, Procedure is same but only the key is different. Follow the steps below:

Step 1: Browse to the following key

HKEY_CLASSES_ROOT\Directory\shellex\ContextMenuHandlers

Step 2: Right click ContextMenuHandlers and create a new key named Copy To. 
Right click it again and create another new key named Move To.

Step 3:
left click on the right hand pane, add the same default values as you did for Files:

For Copy To:

{C2FBB630-2971-11d1-A18C-00C04FD75D13}

For the Move To:

{C2FBB631-2971-11d1-A18C-00C04FD75D13}

Exit the registry and you are done.

Now you can easily Copy or Move any file or folder with ease.
Hope you like it...

Hidden Secret USSD Codes for Android Devices

In this topic, you’ll get several hidden secret codes which can be used in any Google Android mobile phone to access things which are not accessible by default.


Download our Android App Best Computer Guide


DISCLAIMER: This information is intended for experienced users. It is not intended for basic users, hackers, or mobile thieves. Please do not try any of following methods if you are not familiar with mobile phones. We’ll not be responsible for the use or misuse of this information, including loss of data or hardware damage. So use it at your own risk.

*#*#4636#*#*

This code can be used to get some interesting information about your phone and battery. It shows following 5 menus on screen:

  • Phone information
  • Battery information
  • Battery history
  • Usage statistics
  • Wifi information


Menus might differ for different mobile phones. Check out following video which shows the above code in action:

*#*#7780#*#*

This code can be used for a factory data reset. It’ll remove following things:

  • Google account settings stored in your phone
  • System and application data and settings
  • Downloaded applications
It’ll NOT remove:

  • Current system software and bundled applications
  • SD card files e.g. photos, music files, etc.

PS: Once you give this code, you get a prompt screen asking you to click on “Reset phone” button. So you get a chance to cancel your operation.

*2767*3855#

Think before you give this code. This code is used for factory format. It’ll remove all files and settings including the internal memory storage. It’ll also reinstall the phone firmware.

PS: Once you give this code, there is no way to cancel the operation unless you remove the battery from the phone. So think twice before giving this code.

*#*#34971539#*#*

This code is used to get information about phone camera. It shows following 4 menus:

  • Update camera firmware in image (Don’t try this option)
  • Update camera firmware in SD card
  • Get camera firmware version
  • Get firmware update count


WARNING: Never use the first option otherwise your phone camera will stop working and you’ll need to take your phone to service center to reinstall camera firmware.

*#*#7594#*#*

This one is my favorite one. This code can be used to change the “End Call / Power” button action in your phone. Be default, if you long press the button, it shows a screen asking you to select any option from Silent mode, Airplane mode and Power off.

You can change this action using this code. You can enable direct power off on this button so you don’t need to waste your time in selecting the option.


*#*#273283*255*663282*#*#*

This code opens a File copy screen where you can backup your media files e.g. Images, Sound, Video and Voice memo.


*#*#197328640#*#*

This code can be used to enter into Service mode. You can run various tests and change settings in the service mode.


WLAN, GPS and Bluetooth Test Codes:

*#*#232339#*#* OR *#*#526#*#* OR *#*#528#*#* – WLAN test (Use “Menu” button to start various tests)

*#*#232338#*#* – Shows WiFi MAC address

*#*#1472365#*#* – GPS test

*#*#1575#*#* – Another GPS test

*#*#232331#*#* – Bluetooth test

*#*#232337#*# – Shows Bluetooth device address

*#*#8255#*#*

This code can be used to launch GTalk Service Monitor.

Codes to get Firmware version information:

*#*#4986*2650468#*#* – PDA, Phone, H/W, RFCallDate

*#*#1234#*#* – PDA and Phone

*#*#1111#*#* – FTA SW Version

*#*#2222#*#* – FTA HW Version

*#*#44336#*#* – PDA, Phone, CSC, Build Time, Changelist number

Codes to launch various Factory Tests:

*#*#0283#*#* – Packet Loopback

*#*#0*#*#* – LCD test

*#*#0673#*#* OR *#*#0289#*#* – Melody test

*#*#0842#*#* – Device test (Vibration test and BackLight test)

*#*#2663#*#* – Touch screen version

*#*#2664#*#* – Touch screen test

*#*#0588#*#* – Proximity sensor test

*#*#3264#*#* – RAM version

How to unlock Android Lock pattern without Factory Reset

The new devices usually have built-in unlock patterns, which is easy to use but after several wrong attempts it locks permanently. When it happens, you have to use your ID that you use in your Google Play store to unlock that forgotten pattern. But there is a problem with this method if you are not connected to the internet then you will not be able to unlock your phone without this method.


Download our Android App Best Computer Guide


However, you don’t need to worry about, in this tutorial you will learn how to unlock and reset your Android device in case you have forgotten your phone’s pattern. Follow the given steps and get your work done without paying any cost to the experts.

Unlock Pattern with Google Account

When we try to unlock our phone using wrong patterns, a message appears with two options “next” and “try again”.


Step 1: Go with the “next” where you can see two options to unlock your phone, one is to answer the security question, and the other is to provide Google account details.

Step 2: If you have settled your security question, answer it and get your phone unlocked quickly. On the other hand, if you didn’t set security question you would have to provide your Google account details.

Step 3: After this process, you will be able to choose a new pattern to use for the next time.

By following above methods, you will be able to unlock Android phone pattern lock without a factory reset. Happy using your Android device! We hardly prefer this way to unlock your phone, it helps you to avoid important data loss and saves your time.


Unlock Pattern Without Google Account
Step 1: Switch off your smartphone and wait for a while when switched off

Step 2: Press Volume up + Home Key + Power Button; hold these buttons until the phone boots. (If your device doesn’t contain ‘home’ button simply hold other two buttons)

Step 3: When your phone will boot, the screen will appear with different options

Step 4: Now scroll down the screen using volume key and choose “Restore Factory Defaults” or “Delete all User Data” depending on the options shown by your device.

Step 5: After the above settings, choose the “Reboot System Now” and wait for your phone to reboot

Caution
  • This way you may lose all your data and apps through operating it without Google account.
  • This is general factory reset option to unlock your phone, but for specific phone’s factory reset you have to search for your Android phone or tablet.

What is MAC Address and How to spoof it on Android Phones


A Media Access Control address (MAC address) is a 12-character unique identifier assigned to a specific piece of hardware such as the network adapter of your WiFi device. In simple words, a MAC address can be used to uniquely identify your Android phone on the Internet or the local network.


Spoofing MAC Address on Android Devices
Even though MAC address is embedded on the hardware device during manufacture, it can still be spoofed to input a new one of your choice. Here is a detailed instruction on how to spoof MAC address on your Android phone.Before you spoof the MAC address, you need to record the original/current MAC address of your device which can be done according to the instruction below:
* On the Home Screen of your phone, tap Menu button and go to Settings.
* Tap About Device and go to Status
* Now scroll down to record the 12-digit code shown under Wi-Fi Mac address. An address would read something like:
Example MAC address: E5:12:D8:E5:69:97


Download our Android App Best Computer Guide


Requirements for Spoofing the MAC Address
1.Rooted Android Phone
2.Busy Box app installed on your phone
3 Once Busy Box is installed, you need to install Terminal app.

Once the above requirements are satisfied, follow the instructions below to spoof your MAC address:
Step 1: Open the Terminal app and type the commands as listed below:
$su[HIT ENTER]
$busybox iplink show eth0[HIT ENTER]
(This will show your current MAC address, just for your confirmation)

Step 2: Now, type the following command:
$busybox ifconfig eth0 hw etherXX:XX:XX:XX:XX:XX[HIT ENTER]
(In the above command, replaceXX:XX:XX:XX:XX:XX with your new MAC address)

Step 3: You have now spoofed your MAC address successfully. To check for the change enter the following command again:
$busybox iplink show eth0[HIT ENTER]
(Now you should see your new MAC address)

I hope you like this post. For feedback and queries, pass your comments…

CALLER ID SPOOFING : What is it and How it works


Caller ID spoofing is the act of making the telephone network to display any desired (fake) incoming number on the recipient’s Caller ID display unit instead of the original one. With this, it is possible to make a call appear to have come from any phone number that the caller wishes.

Unlike what most people think, an incoming call may not be from the number that is displayed on the Caller ID display unit. Because of the high amount trust that the people have in the Caller ID system, it is often possible for the caller to easily fool the call recipients and make them believe that the number displayed on the Caller ID display is real. This is all possible through the technique called Caller ID spoofing.


How to Spoof Caller ID?

You can easily spoof any Caller ID using services like SpoofCard. In order to use the spoofcard service, you need to pay in advance and obtain a PIN (Personal Identification Number) which grants access to make a call using the Caller ID spoofing service. Once you have purchased the service, you will be given access to login to your SpoofCard account. To begin with, you need to call the phone number given by the SpoofCard service and enter the PIN. Now, you will be given access to enter any phone number you want to call and also the number you wish to appear on the recipient’s Caller ID display unit.

Once you select the options and initiate the calling process, the call is bridged and the person on the other end receives your call. The receiver would normally assume that the call was coming from a different phone number (the spoofed number chosen by you), thus deceiving the recepient into thinking that the call was coming from a different individual or organization than the caller’s. In this way, it becomes just a cake walk to spoof Caller ID and fool the receiver on the other end. SpoofCard also provides an option to change the tone of your voice so that it can appear as a male or a female voice.

Thus, you neither need to be a computer expert nor have any technical knowledge to spoof Caller ID. For more information on this service, you can visit the Spoof Card website from the link below:

SpoofCard – Caller ID Spoofing Service


Download our Android App Best Computer Guide


How Caller ID Spoofing works?

Caller ID spoofing is done through various methods and using different technologies. The most commonly used technology to spoof Caller ID is VOIP(Voice Over IP) and PRI (Primary Rate Interface) lines.

Today, most VOIP systems provide an option for its users to enter whatever number they want in the calling party field and this number is sent out when they make a call. Hence, it is easily possible for any user to spoof Caller ID provided they have a VOIP system and know how to properly configure it to spoof the Caller ID. However, sites like SpoofCard provide an easy and cheap spoofing services for those who aren’t using VOIP systems that they can configure themselves.

Caller ID spoofing is possible and being performed right from the days Called ID system was introduced. However, most people are unaware of the fact that it is possible to spoof Caller ID and make any number to be displayed on the receiver’s end. In the past, this was mostly used by telemarketers, collection agencies, law-enforcement officials, and private investigators. But today, it is available to any Internet user who wish to do this.

How to Block FB/Other Sites on your Computer


How To Block Facebook ?


Step 1: Go to Start > Programs > Accessories
Step 2: Then Right click on Notepad and Run it as administrator.
Step 3: Now open host file by clicking on File > Open and locate to following address

C:\WINDOWS\system32\drivers\etc

Step 4: Then just below

# 127.0.0.1 localhost

paste folowing code

# Blocking Facebook

127.0.0.1 login.facebook.com

127.0.0.1 http://www.facebook.com

127.0.0.1 apps.facebook.com

127.0.0.1 blog.facebook.com

Step 5:
Now save the host file and done.


Step 6: Open any browser and try to open facebook. It won’t open. If facebook opens then you might have done somthing wrong. (let me know if you face any problem)


Download our Android App Best Computer Guide


Blocking Other Website

If you want to block website other then facebook then change facebook address with whatever website you want to block. For example: to block google paste following code below # 127.0.0.1 localhost


# block google

127.0.0.1 http://www.google.com

How to instantly Install and Run Backtrack on Android


Android is the best OS for penetration testing. It designed for digital forensics and penetration testing or hacking tool. It comes with many more updated tools. As the Backtrack is also available with ARM architecture which makes it possible to run Backtrack on a ARM machine such as mobiles or tablets.


Download our Android App Best Computer Guide


Requirements:

2. Backtrack ARM [ Download ]

3. BusyBox [ Download ]

5. If you are using PC then you need 7zip for extraction otherwise you can use zarchiver on you android phone. [ Download ]


Step to Install and Run Backtrack On Android:

First of all extract the BT5-GNOME-ARM.7z. and copy the “BT5” folder and then put in your phone’s root directory. Here mine phone is/sdcard. The root directory is different for different mobile devices.

Step 1:
Now install all the above apps Busybox, Android Terminal, Android Vnc.

Step 2: 
After installing BusyBox application open it and wait until it finish loading and then click on Smart install.

Step 3: Now open the Android Terminal and type the following command:

sucd /sdcard/BT5
sh bootbt


NOTE :-When you type su in terminal it will ask you for super user request and you have to tap on Grant.

Step 4
After this, type the following commands in Terminal.

export USER=root
vncpasswd


Step 5: After entering vncpasswd the terminal will ask you to enter password. Enter the desired password and hit enter.

Step 6: Now type the following commands.


tightvncserver -geometry 1280×720


Step 7: The terminal emulator will creates the localhost to connect it to VNC server. Now note the localhost port marked red below. Now minimize the terminal emulator.

Step 8: Open the android VNC and type the following settings.


Nickname : BT5
Password : your password here which you entered in terminal (step no.6)
Address : localhost
Port : 5906

NOTE : Make sure that your localhost’s port matches with terminal’s localhost. 
Here mine New ‘X’ desktop is localhost:6. Your may be different. So, in VNC type Port 590X where the“X” is the localhost in android terminal.

That’s it now just tap on connect to run the Backtrack on your android. So in this way you can sucessfully install and run backtrack 5 on android. If you face any problem feel free to discuss in below comments !

How to Install and Run Kali Linux on any Android Smartphone


Kali Linux is widely used OS for penetration testing and best for creating dummy environment to test the various hacking attacks. And this cool OS can now can get installed on your android too, you must be wonder from this but it is possible, you can install Kali Linux on your android with our complete guide below. So read out the complete post to proceed.


Download our Android App Best Computer Guide


How To Install Kali Linux On Any Android

In this method you will be installing all the Linux files on your android by downloading them and then using the complete interface for your Pen-testing or any other way that you like. So read out the all the steps below to proceed.

Requirements:

* Fully charged Android
* Good Internet Connection(For Download Kali Linux images)
* Rooted Android(Guide To Root Your Android)
* Atleast 5GB Of Free Space


Steps To Install Kali Linux On Any Android:

Step 1: First of all download and install Linux Deploy App in your android from the Google Play Store.

Step 2: Now After downloading and installing it launch the app in your device and there tap on download button.


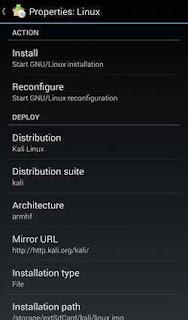
Step 3: Now there tap on Distribution option and change it to Kali Linux instead of Linux.


Step 4: Now scroll up and click on the Install button at the top of there.

Step 5: Now wait for the download to complete time taken can be vary depending upon your internet speed.

Step 6: Now download and install VNC Viewer App in your android from the Play Store.

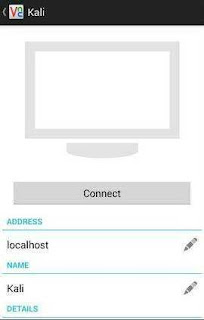
Step 7: Now launch the app and fill up the settings as displayed on the screenshot below.


Step 8: Now click on Connect button there.


Step 9: That's it you are done, Now Kali Linux gets installed in your android and you can enjoy the dummy hacking environment in your android.

So above is the complete guide for Install Kali Linux On Any Android. With this you can easily test your knowledge about pentesting attacks on your android using the app discussed above. So try out this today. Hope you like our work, do share with others too. Leave a comment below if you facing any problem at any step discussed above.

How to Make/Create your Own Run Commands for any File, Folder, Application


Today In this tutorial, We are going to see that How can we create a Run Command for any File, Folder, or an Application in Windows 7/8/10. This can be done in a minute since the process is quite simple and short.


Download our Android App Best Computer Guide


Here's How : Just follow the Steps

Step 1: Create a Shortcut for any File, Folder, or Application for which you want to create the Run(Win+R) command.

Step 2: Rename the shortcut created above as you want to name the Run Command for that Specific File.

Step 3: Now Copy and the Shortcut File in the C:\Windows\   Folder

Step 4: Open Run Dialog Box(Press Win+R) and enter the name of the Shortcut File which you named in Step 2, Press Enter.
Voila!!! Your Run Command is Working

Hope you like this tutorial. By using this you can create Run Commands for any File, Folder, or Application which you access frequently while using your Computer

Steganography : Hide Data in Image, Audio and Video Files

Ever wondered to know how to hide secret data in image, audio and video files? Well, in this post I will take you through a concept called steganography using which, it is possible to hide your secret information in image files, songs or any other file of your choice. At the end of this post, you can also download free stegnographic tools and start hiding your data.


Download our Android App Best Computer Guide


What is Steganography?


Steganography is a means of obscuring data where secret messages are hidden inside computer files such as images, sound files, videos and even executable files so that, no one except the sender and the receiver will suspect the existence of stealth information in it. Steganography may also involve the usage of cryptography where the message is first encrypted before it is concealed in another file. Generally, the messages appear to be something else such as an image, sound or video so that the transfer of secret data remains unsuspected.

The main advantage of steganography over other methods such as cryptography is that, it will not arose suspicion even if the files fall in the hands of a third party. Unlike cryptographic messages, stegnographic messages will no way attract the attention of a third party by themselves. Thus stegnanography has an upper hand over cryptography as it involves both encryption and obscurity.

What are the Applications of Steganography?

Steganography is mainly used to obscure confidential information/data during storage or transmission. For example, one can hide a secret message in an audio file and send this to another party via email instead of sending the message in the textual format. The receiver on the other end will decrypt the hidden message using the private decryption key. In a worst case scenario, even if a third party does manage to gain access to the email, all he can find is the audio file and not the hidden data inside it. Other usage of steganography include digital watermarking of images for reasons such as copyright protection.

Even though steganography has many useful applications, some may use this technique for illegitimate purposes such as hiding a pornographic content in other large files. Rumors about terrorists using steganography for hiding and communicating their secret information and instructions are also reported. An article claiming that, al-Queda had used steganography to encode messages in images and transported them via e-mails, was reported by New York Times, in October 2001.


How do Steganography Tools Work?
Stegnography tools implement intelligent algorithms to carefully embed the encrypted text messages or data inside other larger files such as an image, audio, video or an executable file. Some tools will embed the encrypted data at the end of another file so that there will be enough room for storing larger data.

There are many steganography tools available online but only a few are able to work flawlessly. I did not find any tool that worked perfectly on both small and large data. However, I have managed to find a tool that can work perfectly on all types of files and all size of data. The tool is called “Stego Magic“. You can download it from the following link.

Download StegoMagic.zip

The zip file contains two versions of Stego Magic: One for encrypting the text messages and the other for encrypting binary files. StegoMagic_TXT can be used to hide text messages in other files such as an image or a sound file. StegoMagic_BIN can be used to hide one binary file in another such as an executable file inside an image or an image inside a video file.

With Stego Magic, there is no limitation on the size and type of the file that you are intending to hide. For example, you can hide a video of size 1 GB in an image of size 1 MB or hide an executable file inside a WORD document. The tool is pretty straightforward to use and requires no special understanding of the concept.

At the end of the encryption process, a secret decryption key will be generated and the same is required during the decryption process.


How to Use Stego Magic?

Suppose you want to hide a text message inside a JPG file:
  • Place the JPG and the text file (.txt) in the same folder as that of exe
  • Run exe and follow the screen instructions to embed the text message inside the JPG image.
Please note that if you’re using Windows 7/Vista, right-click the file and select “Run as Administrator”. Otherwise the tool may fail to work properly.
  • Note down the secret decryption key.

Now you can send this image to your friend via email. To decrypt the hidden message, your friend should load this JPG file onto the Stego Magic tool and use the secret decryption key.

I hope you’ve now understood what is steganography and how to use it to hide your secret data. For queries and feedback, please pass your comments.

How to install Xposed Framework Android


Xposed Framework is the most powerful tool that android user must try after rooting their android. Xposed Framework can be better compare as a cydia for iOS with the help of which you can add lots of new features to your device. Xposed installer provides a platform to run lots of cool tweaks in your android device. Till now we had discussed lots of tweaks that you can do after installing xposed Framework. So have a look on complete guide for installing Xposed Framework on your android including the latest version Android 6.0 Marshmallow.

Also Read: How to Launch Favourite Apps From Android Lockscreen


Download our Android App Best Computer Guide


How To Install Xposed Framework In Android

The method is very simple and the only thing you need is a rooted android that will allow you to install the apk of Xposed Framework with a super user grant. So follow up the steps below to proceed.

Cool Tweaks To Try After Installing Xposed Installer :-* How to Play YouTube Videos in Background Without Rooting Android ,
* How To Add Floating Windows Feature In Android

Some of the Modules That Will Work After Installing Xposed Framework
*.Burnt Toast
*.CrappaLinks
*.Play Store Changelog
*.XXSID Indicator
*.Greenify
*.Amplify
*.YouTube adaway
*.Xposed GEL Settings (beta)
*.Cool tool
*.NotifyClean
*.Min min guard
*.BootManager
*.ReceiverStop
*.EnhancedToast
*.Force immersive mode
*.Swype Tweaks
*.Swipeback 2
*.Spotify skip
*.Lollistat
*.Flat Style Keyboard
*.Force Fast Scroll
*.Flat style colored bars
*.Materialised xposed (working for some)
*.App settings
*.Lockscreen music art remover
*.NetStrenght
*.LWInRecents
*.Screen Filter
*.BubbleUPNP’s Audio cast
*.Snapcolors 3.4.12

Partially working modules:
*.Gravity box (very limited)
*.XBridge
*.Boot manager (working for some)


Steps To Install Xposed Framework On Android:

Step 1: First of you need a rooted android and for that you can follow our guide to Root any Android Device.

Step 2: Now you need to check your CPU architecture to get the perfect Xposed framework for you and for this you will use app Hardware Info.

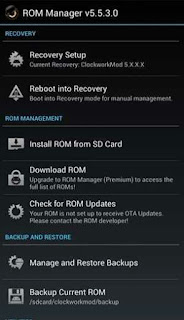
Step 3: Now you need to get the custom recovery in your android and for that you will search your device respective custom recover and can flash it using the app ROM Manager.


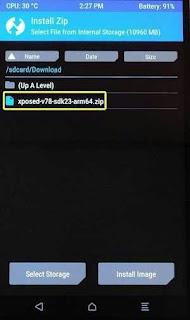
Step 4: Now you have to select the zip file of Xposed framework according to your CPU architecture and you can get Xposed Framework zip from HERE.

Step 5: Now flash this zip file through your android recovery using the ROM manager app.


Step 6: And when the zip is being flashed, then simply Reboot your device.

Step 7: Now you will have Xposed Installer installed on your device now you can try lots of cool tweaks in your android and some of the cool tweaks we had discussed above that you can try.

So above is all about How To Install Xposed Framework In Android. With this you can easily install a cool tweaker in your android device and you can add lots of new features using this. So try this and have fun by adding all new features in your device. Hope you like this cool solution, do share with other too. Leave a comment below if you have any related queries with this.