How to use custom DNS Settings in Android Mobile Phones


We have told you in previous post how to use custom DNS settings in Windows operating system to improve Internet connection speed and reliability:
How to Change or Use Custom DNS Server Settings in Windows?

Using custom DNS settings might become very useful if you are getting very poor Internet speed or if a website is blocked by your ISP(Internet Service Provider). With the help of custom DNS settings, you can get faster Internet speed and can access blocked websites.

But what if you are using Internet in your mobile phone and some websites are blocked by the network provider or you are getting slower Internet speed in your mobile phone?
You can set and use custom DNS settings such as "Google Public DNS" or "OpenDNS" in your mobile phone as well.

NOTE: You can only use custom DNS settings for Wi-Fi connections as Google Android doesn’t provide any option to use custom DNS for cellular data connections.

Following simple steps will help you in setting and using custom DNS settings in your Google Android mobile phone:

Step 1: First of all open Wi-Fi settings in your Android mobile phone. You can open Wi-Fi settings from Settings menu or tap and hold on Wi-Fi icon present in notification bar to directly open Wi-Fi settings.


Step 2: Now tap and hold on the desired Wi-Fi network and select “Manage network settings” or “Modify network” or other similar option.
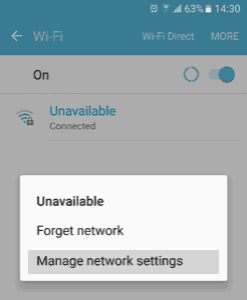


Step 3: Now check “Show advanced options” checkbox and select “Static” option from the IP settings drop-down list.

Step 4: Now you can enter desired DNS settings in DNS 1 and DNS 2 boxes.


You can use any of following 2 popular DNS server settings:

Google Public DNS:
Preferred DNS server : 8.8.8.8
Alternate DNS server : 8.8.4.4

OpenDNS:
Preferred DNS server : 208.67.222.222
Alternate DNS server : 208.67.220.220

Step 5: At last save the changes and it’ll immediately start using custom DNS settings.

Done…

How to change or use custom DNS Server Settings in Windows

Many times people face problems while accessing a particular website. It might be due to website server problem. But sometimes it might be a fault of your Internet service provider as their DNS server was not updated within time. That’s why its recommended to use external DNS instead of the DNS provided by your ISP. There are many DNS available to use like Google Public DNS, Open DNS, etc.

But changing DNS settings is not an easy task and requires some steps to follow. So today in this tutorial we are going to tell you how to use custom 3rd party DNS Server settings in Windows operating system.

This tutorial will work for all Windows versions. If you are also facing problems with your Internet connection speed and want to use custom DNS server settings, follow these simple steps:

STEP 1:
First of all we’ll need to open Network Connections window. We can open it in many ways:
Method 1.a: Right-click on Network icon present in Taskbar notification area and select “Open Network and Sharing Center” option.


It’ll open Network and Sharing Center window. Now click on “Change adapter settings” link given in left sidebar. It’ll open classic Network Connections window.


Method 1.b: You can directly open Network Connections window by using following command in RUN dialog box:

explorer shell:::{7007ACC7-3202-11D1-AAD2-00805FC1270E}

STEP 2:
Now select the connection/adapter you want to change DNS settings for, right-click on it and select Properties option.

STEP 3:
In connection properties window, under Networking tab, scroll down and you’ll see Internet Protocol Version 4 (TCP/IPv4) option.


Double-click on the option and it’ll open TCP/IPv4 properties window.

STEP 4: Now enable “Use the following DNS server addresses” option and type any of following DNS server values:

Google Public DNS:Preferred DNS server : 8.8.8.8
Alternate DNS server : 8.8.4.4
OpenDNS:
Preferred DNS server : 208.67.222.222
Alternate DNS server : 208.67.220.220


That’s it. Apply the changes and it should immediately start working on your Internet connection.

PS: If you don’t notice any changes, you can try to clear DNS cache. Open Command Prompt as Administrator and then execute ipconfig/flushdns command to clear DNS cache.